CollectionView CustomLayout 예제 소개
UICollectionView Custom Layout Tutorial: Pinterest
Build a UICollectionView custom layout inspired by the Pinterest app, and learn how to cache attributes and dynamically size cells.
www.raywenderlich.com
raywenderlich.com에 있는 예제다. CollectionView를 통해 높이가 제각각인 Grid를 만들 수가 있는데 코드를 살펴보면서 CollectionView의 CustomLayout 기능을 공부하고자 한다.
기본 환경 설정 (UICollectionViewFlowLayout)

우선 Apple에서 제공하는 UICollectionViewFlowLayout로 2줄로 된 CollectionView를 만들어보자.
Code로 View를 만드는걸 선호하기 때문에, SceneDelegate에 아래와 같이 수정해준다.
func scene(_ scene: UIScene, willConnectTo session: UISceneSession, options connectionOptions: UIScene.ConnectionOptions) {
    guard let scene = (scene as? UIWindowScene) else { return }
    window = UIWindow(windowScene: scene)
    // ViewController에 UICollectionViewFlowLayout을 Layout으로 설정함
    window?.rootViewController = ViewController(collectionViewLayout: UICollectionViewFlowLayout())
    window?.makeKeyAndVisible()
}
CollectionView와 CollectionViewCell을 만들어주자.
CollectionViewCell
import UIKit

class CollectionViewCell: UICollectionViewCell {
    // MARK: - Lifecycle
    override init(frame: CGRect) {
        super.init(frame: frame)
        backgroundColor = .red
    }

    required init?(coder: NSCoder) {
        fatalError("init(coder:) has not been implemented")
    }
}
ViewController
import UIKit

private let reuseIdentifier = "CollectionViewCell"

class ViewController: UICollectionViewController {

    override func viewDidLoad() {
        super.viewDidLoad()
        // Do any additional setup after loading the view.
        collectionView.backgroundColor = .white
        collectionView.register(CollectionViewCell.self, forCellWithReuseIdentifier: reuseIdentifier)

        // CollectionView는 Item의 Width로 보여줄 갯수를 자동으로 지정한다.
        let flowLayout: UICollectionViewFlowLayout = UICollectionViewFlowLayout()
        let itemWidth = (view.frame.width / 2) - 8
        flowLayout.itemSize = CGSize(width: itemWidth, height: 100)
        collectionView.collectionViewLayout = flowLayout

    }
}

// MARK: UICollectionViewDataSource
extension ViewController {

    /// cell 데이터가 몇 개인가
    override func collectionView(_ collectionView: UICollectionView, numberOfItemsInSection section: Int) -> Int {
        return 10
    }

    /// 각 Cell에 필요한 데이터를 설정한다.
    override func collectionView(_ collectionView: UICollectionView, cellForItemAt indexPath: IndexPath) -> UICollectionViewCell {
        let cell = collectionView.dequeueReusableCell(withReuseIdentifier: reuseIdentifier, for: indexPath) as! CollectionViewCell
        return cell
    }
}
이제 실행시키면 위 사진 예제처럼 2개씩 보여주는 CollectionView를 만들게 된다.
ViewController의 viewDidLoad에서 collectionView.collectionViewLayout = flowLayout 코드를 통해 layout을 지정 할 수 있음을 볼 수 있다.
flowLayout 대신 UICollectionViewLayout을 상속받는 CustomLayout을 직접 만들어 넣어보자.
Layout - CollectionView LifeCycle
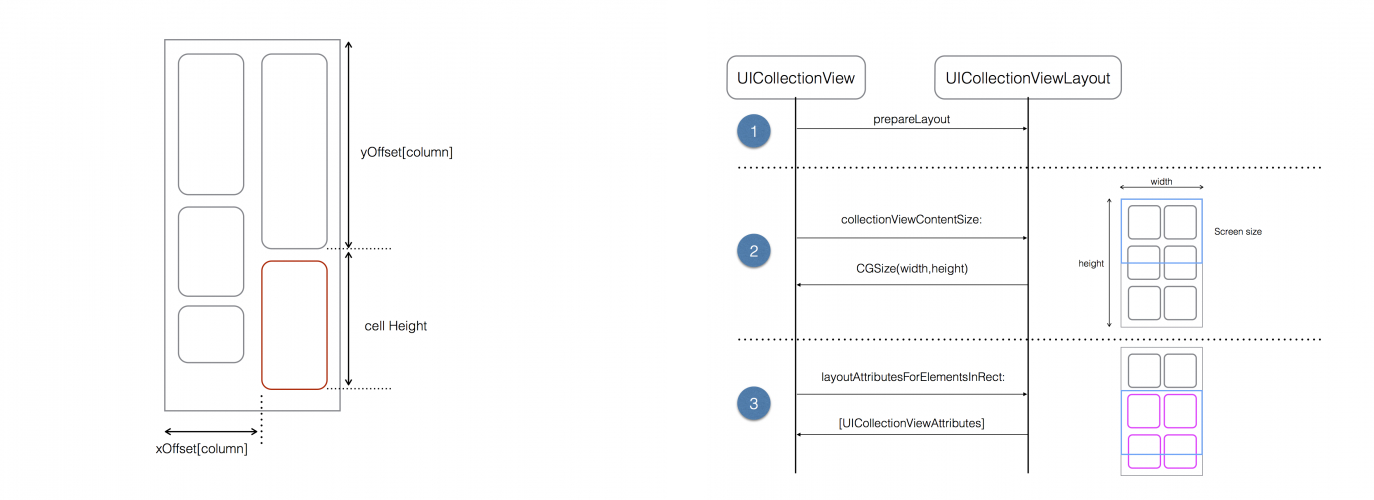
예제를 보면 CollectionView에서 화면에 보여주기 전에 Layout을 통해 Item(Cell)의 정보(x,y(좌표),height,width 등)를 받는 사진을 볼 수 있다. Layout에서 Item에 관한 정보를 개발자가 수정해서 전달하면 복잡한 UI도 만들 수가 있는 것 같다.
그려지는 방식을 보면, Layout에서 각 Item에 관한 height, width, x,y좌표를 다 지정하고 UICollectionViewAttributes에서 이런 정보들을 넘겨준다. 누군가 먼저 만들어놓은 예제가 있다 하더라도 만들면서 에러 나지 않을까 불안할 것 같다..
속성 설명
실제 코드에서 어떻게 구현하고 있는지 살펴보자.
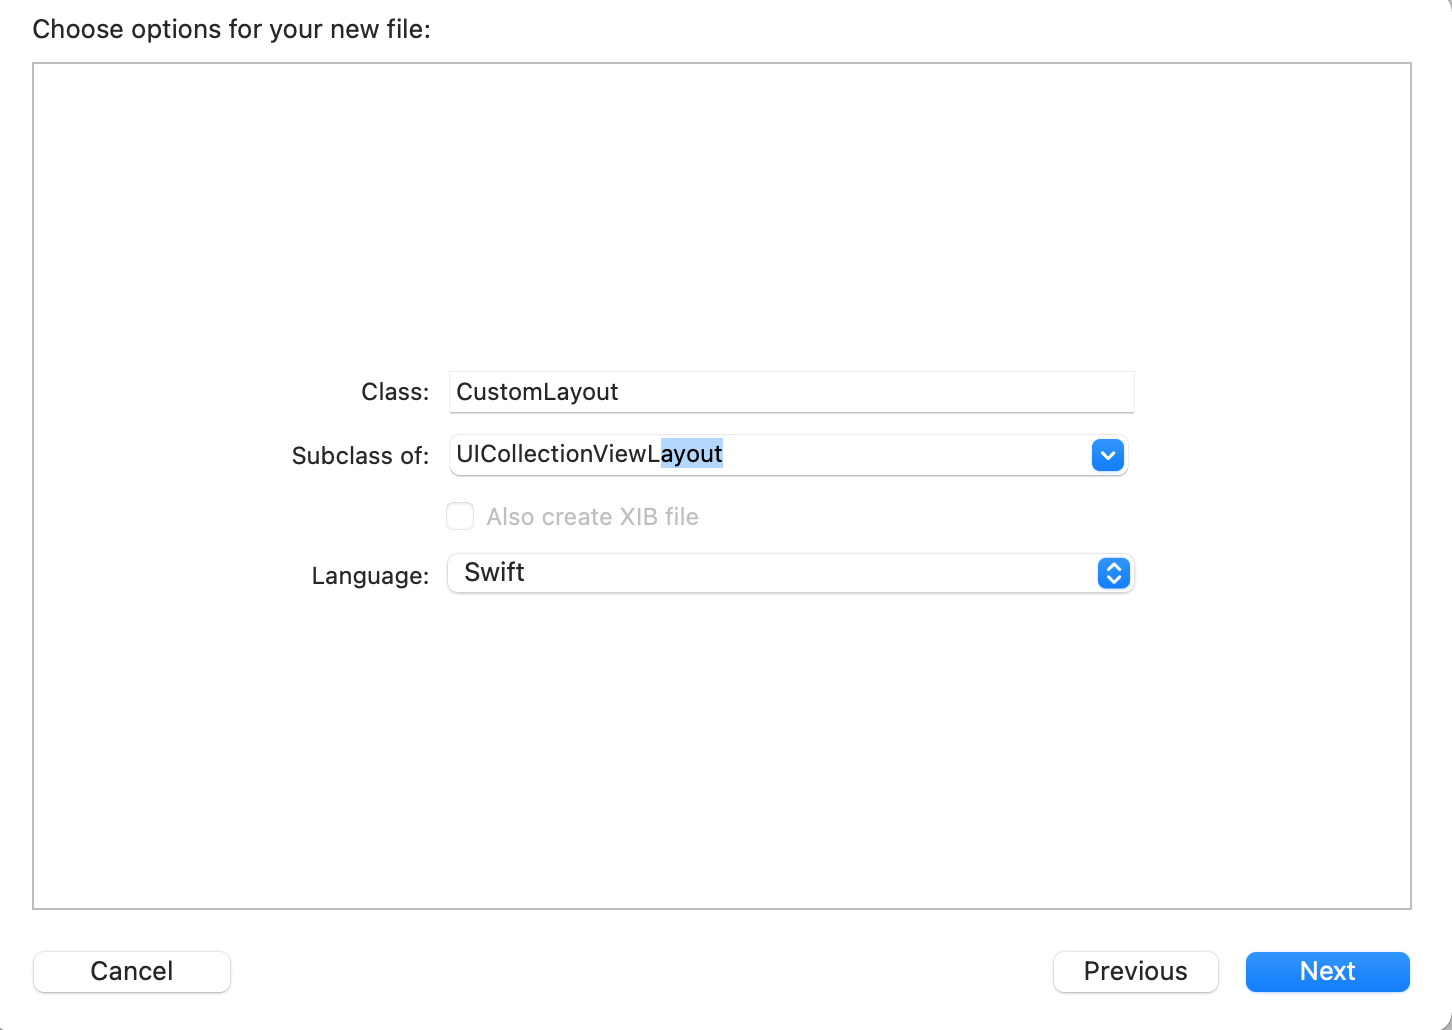
구현하게 UICollectionViewLayout을 상속받는 Swift파일을 하나 만들자.
Delegate를 하나 만드는데, controller에서 동적인 높이를 받기 위해 구현한다.
protocol CustomLayoutDelegate: AnyObject {
    // 동적으로 높이를 알기위해서 Delegate 생성
    // collectionView를 사용하는 Controller에서 구현하게 됨.
    func collectionView(_ collectionView: UICollectionView, heightForPhotoAtIndexPath indexPath: IndexPath) -> CGFloat
}
이제 본격적으로 UICollectionViewLayout 상속받은 Layout에 속성값을 만들어주자.
class CustomLayout: UICollectionViewLayout {
    // 1. 동적 높이을 알기 위한 delegate 참조.(구현은 Controller에서 구현할 거임)
    weak var delegate: CustomLayoutDelegate?

    // 2. 보여질 갯수, item 간의 padding
    private let numberOfColumns = 2
    private let cellPadding: CGFloat = 6

    // 3. item의 정보를 저장할 cache
    private var cache: [UICollectionViewLayoutAttributes] = []

    // 4. CollectionView에서 scrollView의 height라 생각 -> item이 보여지는 양에 따라 계속 증가됨.
    private var contentHeight: CGFloat = 0

    // CollectionView에서 scrollView의 width라 생각
    private var contentWidth: CGFloat {
        guard let collectionView = collectionView else {
            return 0
        }
        // collectionView의 내부 padding?
	    // 나중에 controller에서 inset을 지정할 수 있음. 설정안해주면 기본적으론 0임
        // 설정e.g) collectionView?.contentInset = UIEdgeInsets(top: 23, left: 16, bottom: 10, right: 16)
        let insets = collectionView.contentInset
        return collectionView.bounds.width - (insets.left + insets.right)
    }

    // 5. scroll된 content의 전체 크기
    override var collectionViewContentSize: CGSize {
        return CGSize(width: contentWidth, height: contentHeight)
    }
}
UICollectionViewLayoutAttributes 배열 타입을 cache 라는 이름으로 담는데, 해당 타입은 collectionView의 item의 bound, frame, size, isHidden등 item에 대한 속성 값을 담고있는 타입이다. item의 크기나, 보여 줄지 말지에 대한 내용을 담고있다.
나중에 이 cache 배열을 가지고 collectionView에게 각 Item에 대한 정보를 전달한다.
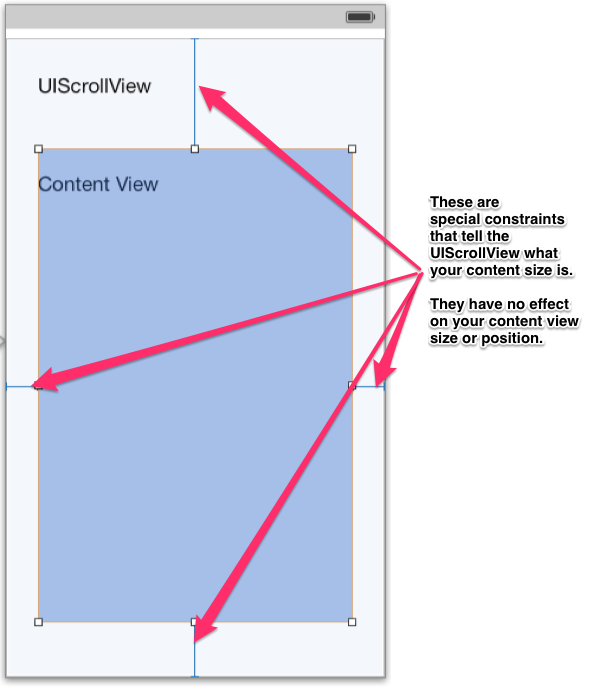
content 라는 말이 나오는데 scrollview와 content의 크기가 달라서 그렇다. Scroll영역이 따로 있고, content를 넣는 영역이 따로 있다.
이해할 수 있는 아래 사진을 보자.
Prepare 메서드, Attribute 메서드 설명
CollectionView에서 Prepare가 먼저 호출이 되는데, 여기서 cache 배열에 각 item 정보를 담아준다.
조금 헷갈리는게 2줄로 보여주는데 전체 배열을 통해 item정보를 전달하는게 아니라, 총 2줄이기 때문에 2개의 배열을 만들고 0, 1을 번갈아가면서 값을 변경한다. 코드로 살펴보자.
// x,y위치를 지정하고, width, height로 화면에 그림.
// autoLayout 개념과 유사하다.
override func prepare() {
    // 1 cache 유무 확인
    guard cache.isEmpty, let collectionView = collectionView else {
        return
    }

    // 2 numberOfColumns: Column의 갯수
    let columnWidth = contentWidth / CGFloat(numberOfColumns)
    var xOffset: [CGFloat] = []

    // xOffset은 height와 다르게 사용자가 지정한 column만큼 일정하다.
    for column in 0..<numberOfColumns {
        xOffset.append(CGFloat(column) * columnWidth)
    }

    // xOffset과 yOffset의 index (column이 2개라면, 0,1 두개임.)
    var column = 0

    // item의 전체 갯수가 아닌 numberOfColumns인 이유는 계속해서 변경되기 때문
    // ex)
    // let liar = Array(repeating: false, count: 5)
    // print(liar)  /* [false, false, false, false, false] *
    var yOffset: [CGFloat] = .init(repeating: 0, count: numberOfColumns)

    // 3 전체 item갯수를 돌면서, cache에 item 정보를 저장함.
    for item in 0..<collectionView.numberOfItems(inSection: 0) {
        let indexPath = IndexPath(item: item, section: 0)

        // 4
        // 동적 높이 계산
        let photoHeight = delegate?.collectionView(
            collectionView,
            heightForPhotoAtIndexPath: indexPath) ?? 180
        let height = cellPadding * 2 + photoHeight

		//item의 frame
        let frame = CGRect(x: xOffset[column],
                           y: yOffset[column],
                           width: columnWidth,
                           height: height)
        // insetBy 만큼 터치 인식 영역이 증가하거나 감소함.
        // dx, dy가 음수이면 bounds의 크기를 증가, dx, dy가 양수이면 bounds의 크기 감소
        let insetFrame = frame.insetBy(dx: cellPadding, dy: cellPadding)

        // 5 item의 x,y,width,height를 지정한 frame을 cache에 저장함.
        let attributes = UICollectionViewLayoutAttributes(forCellWith: indexPath)
        attributes.frame = insetFrame
        cache.append(attributes)

        // 6
        contentHeight = max(contentHeight, frame.maxY)

        yOffset[column] = yOffset[column] + height

        // 다음 item이 다음 열에 배치되도록 설정
        column = column < (numberOfColumns - 1) ? (column + 1) : 0
    }
보여지는 column기준(2로 설정)으로 0,1이 반복되면서 x,y좌표를 설정하는데 이게 나중에 print로 찍어봐야 이해가 좀 된다.
item Frame값을 일일이 다 설정해주는게 굉장히... 에러가 날 여지가 많아보인다.
여기까지 했으면 이제 Controller에게 item의 정보들이 cache값을 전달해주면 거의 완성이다.
CustomLayout에 추가를 해주자.
// 모든 아이템들에 대한 레이아웃 attributes를 반환
// rect 대상 보기를 포함하는 사각형(컬렉션 보기의 좌표계에 지정됨).-> 보여지는 부분.
override func layoutAttributesForElements(in rect: CGRect)
-> [UICollectionViewLayoutAttributes]? {
    var visibleLayoutAttributes: [UICollectionViewLayoutAttributes] = []
    //        (-568.0, 568.0, 856.0, 1136.0)
    //        (-568.0, 0.0, 856.0, 1136.0)
    //        (-568.0, 0.0, 856.0, 1136.0)
    // Loop through the cache and look for items in the rect
    for attributes in cache {
        if attributes.frame.intersects(rect) { // rect과 겹치는지 확인.
            visibleLayoutAttributes.append(attributes)
        }
    }
    return visibleLayoutAttributes
}

// item에 대한 layout속성을 CollectionView에게 알려줌.
override func layoutAttributesForItem(at indexPath: IndexPath)
    -> UICollectionViewLayoutAttributes? {
  return cache[indexPath.item]
}
layoutAttributesForElements가 뭔지 잘 모르겠다.
Mock up 데이터 생성
CollectionView와 Layout을 연결하기전에 Mockup을 생성해줘야한다.
예제는 plist로 생성하는데 나는 swift로 photo 목업데이터를 만들었다.
// Mock up data
struct Photo {
    var title: String
    var imageHeight: Int

    init(title: String, imageHeight: Int) {
        self.title = title
        self.imageHeight = imageHeight
    }

    init?(dictionary: [String: Any]) {
        guard
            let title = dictionary["Title"] as? String,
            let imageHeight = dictionary["ImageHeight"] as? Int
            else {
                return nil
            }
        self.init(title: title, imageHeight: imageHeight)
    }

    static func allPhotos() -> [Photo] {
        var photos: [Photo] = []
        let photosList = [["Title": "One", "ImageHeight": 180],["Title": "Two", "ImageHeight": 120], ["Title": "Three", "ImageHeight": 110], ["Title": "Four", "ImageHeight": 100], ["Title": "Five", "ImageHeight": 50]]

        for dictionary in photosList {
            if let photo = Photo(dictionary: dictionary) {
                photos.append(photo)
            }
        }

        return photos
    }
}
Cell 변경
나는 Cell이 height랑 title을 보여주는 걸 원해서 Cell을 수정했다.
import UIKit

class CollectionViewCell: UICollectionViewCell {

    var title:String? {
        didSet {
            configureUI()
        }
    }

    private var heightLabel:UILabel = {
        let label = UILabel()
        label.font = UIFont.boldSystemFont(ofSize: 16)
        label.textColor = .black
        label.numberOfLines = 0
        label.textAlignment = .center
        return label
    }()

    // MARK: - Lifecycle
    override init(frame: CGRect) {
        super.init(frame: frame)
        addSubview(heightLabel)
        heightLabel.translatesAutoresizingMaskIntoConstraints = false
        heightLabel.centerXAnchor.constraint(equalTo: centerXAnchor).isActive = true
        heightLabel.centerYAnchor.constraint(equalTo: centerYAnchor).isActive = true
        backgroundColor = .red
    }

    required init?(coder: NSCoder) {
        fatalError("init(coder:) has not been implemented")
    }

    func configureUI() {
        guard let title = title else {
            return
        }
        heightLabel.text = title
    }
}
CollectionView - CustomLayout 연결
베끼면서 열심히 만든 CustomLayout을 연결해주자.
- Mock Data를 불러와주자.
// MARK: Properties
// ViewDidLoad 위에 작성
var photos = Photo.allPhotos()

override func viewDidLoad() {
// ...
}
- 동적높이를 계산하는 Delegate를 구현해주자.
// MARK: CustomLayoutDelegate
extension ViewController: CustomLayoutDelegate {
    func collectionView(_ collectionView: UICollectionView, heightForPhotoAtIndexPath indexPath: IndexPath) -> CGFloat {
        // return photos[indexPath.item].image.size.height
        return CGFloat(photos[indexPath.item].imageHeight)
    }
}
- Controller에서 UICollectionViewFlowLayout을 상속받는 Layout을 변경해주자.
override func viewDidLoad() {
      super.viewDidLoad()
      // Do any additional setup after loading the view.
      collectionView.backgroundColor = .white
      collectionView.register(CollectionViewCell.self, forCellWithReuseIdentifier: reuseIdentifier)
      // Flow -> CustomLayout으로 변경
      let layout = CustomLayout()
      layout.delegate = self
      collectionView.collectionViewLayout = layout
      collectionView?.contentInset = UIEdgeInsets(top: 23, left: 16, bottom: 10, right: 16)
  }
- Mockup Data에 맞게 DataSourceDelegate를 변경해주자.
// MARK: UICollectionViewDataSource
extension ViewController {

    /// cell 데이터가 몇 개인가
    override func collectionView(_ collectionView: UICollectionView, numberOfItemsInSection section: Int) -> Int {
        return photos.count
    }

    /// 각 Cell에 필요한 데이터를 설정한다.
    override func collectionView(_ collectionView: UICollectionView, cellForItemAt indexPath: IndexPath) -> UICollectionViewCell {
        let cell = collectionView.dequeueReusableCell(withReuseIdentifier: reuseIdentifier, for: indexPath) as! CollectionViewCell
        let title = photos[indexPath.row].title
        let height = photos[indexPath.row].imageHeight
        cell.title = "\(title)\n\(height)"
        return cell
    }
}
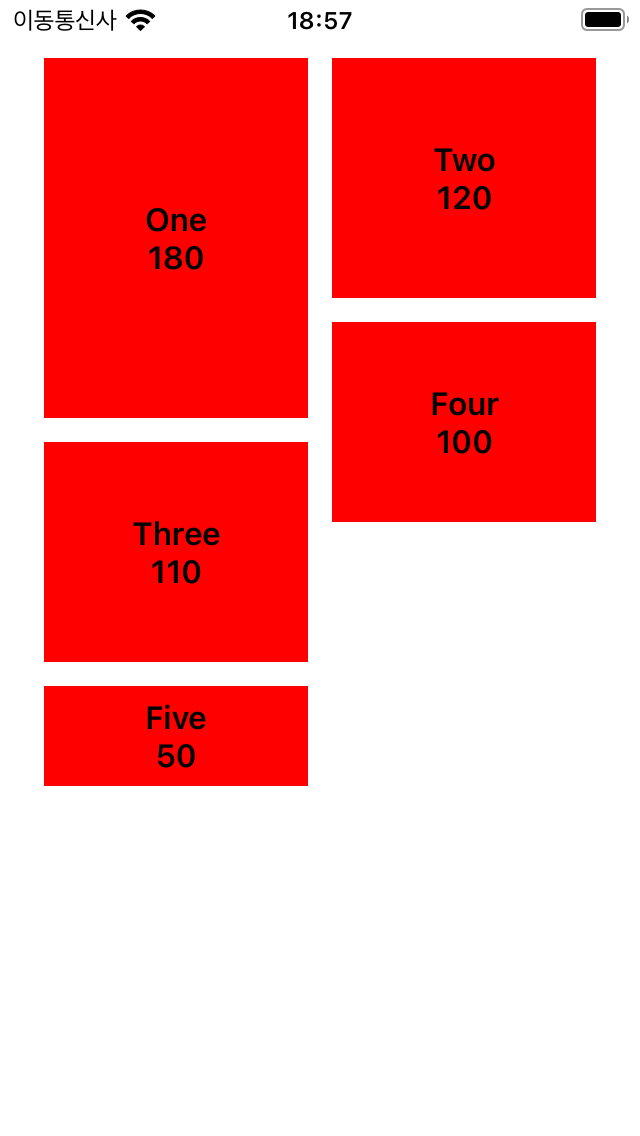
이제 실행하면 아래와 같이 정상적으로 원하는대로 동작함을 확인 할 수 있다.
뭔가 빼먹은게 있을 거 같아, 전체 소스는 깃허브에 올려두었다.
전체 소스
GitHub - HOONITANG/CollectionViewCustomLayoutExample
Contribute to HOONITANG/CollectionViewCustomLayoutExample development by creating an account on GitHub.
github.com
Schedule을 그릴 때 tableView에 x,y,width,height을 지정해서 그린적이 있었는데 다음엔 CollectionView Layout으로 그릴 수 있을 것 같다.
복잡한 Grid을 그릴 땐, 직접 Custom 하고 웬만하면 애플에서 제공하는 UICollectionViewFlowLayout을 사용해야겠다.
직접 Layout을 만드는 건 Cell하나하나 위치를 지정해주는 행위고 에러가 발생할 확률이 너무 높아 보인다.
처음 CollectionView를 공부할 때 FlowLayout 이게 뭔가 했는데 이제야 이해가 된다.
'iOS > ios 아무거나 만들어보기' 카테고리의 다른 글
| CollectionView Prefetch 살펴보기 (0) | 2022.02.23 |
|---|---|
| CollectionView UICollectionViewDelegate 사용해보기 (0) | 2022.02.17 |
| CollectionView 사용해보기 (0) | 2022.02.16 |
| ios - 코드로 constraint 적용해보기 (0) | 2022.02.10 |
| view 코드로 작성하기(ios programmatic ui) (0) | 2022.02.09 |
